If NDIToolbox doesn’t do something you need out of the box, why not write it yourself? We’ve set it up to make it easy to add your own data analysis code by writing plugins in Python. Here we’ll discuss what a plugin is, how to write one, and how to distribute your plugins to others.
What Is A Plugin?
In a nutshell, a plugin is an extra bit of software that’s designed to work with NDIToolbox and extend its functionality. For the most part, plugins in NDIToolbox tend to be small programs – they usually do one thing and one thing only, and they usually do not have a separate user interface. The idea is to have a simple program that receives NDE data and configuration info; performs some sort of function on the data; then returns the results. NDIToolbox worries about the details of how to read data and present it to the user.
If you’re an end user, you can add plugins to your NDIToolbox installation to make the program work for your needs. If you’re more of a developer, you can create your own plugins and share them with others.
Plugins For The End User
Installation
All NDIToolbox plugins must be installed under your plugins folder, which is a subfolder of your NDIToolbox local files folder. Remember from the Quick Start guide that this folder will be under your $HOME folder (e.g. c:\users\chris in Windows 7 or /home/chris under Linux).
Although you can copy a plugin directly to this folder manually, we recommend using NDIToolbox to install your plugins since NDIToolbox will ensure that the plugin is properly structured. From any Plot window, select Plugins from the Tools menu. If you already have a copy of the plugin as a ZIP archive, choose Install Plugin… and select the ZIP to install. The Install Plugin window will pop up, from which you can get more information about the plugin by pressing the About Plugin… button.
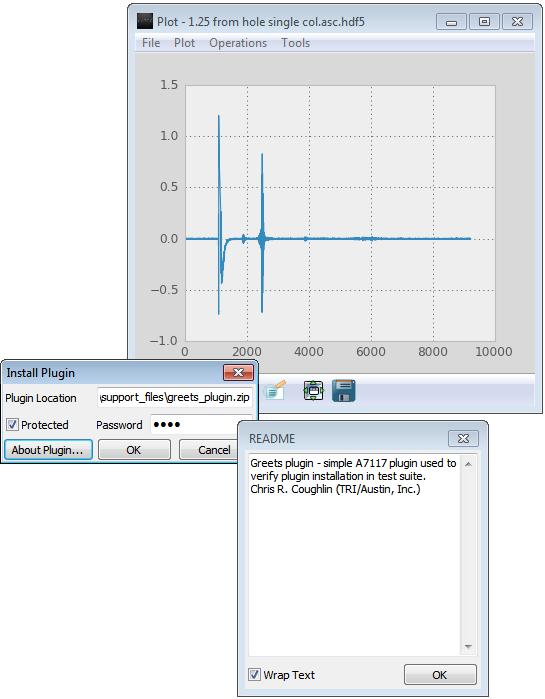
If the ZIP archive has been password-protected, make sure the Protected check box is checked and provide the password you were given by the plugin’s author. When ready to install, click OK to proceed. NDIToolbox will unpack the ZIP archive and install the plugin in your local files folder. If the plugin doesn’t seem to be a proper NDIToolbox plugin, NDIToolbox will abort installation and notify you of the situation.
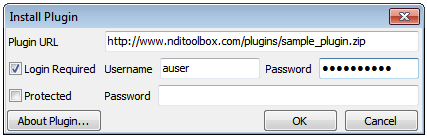
NDIToolbox can also automatically download and install plugins, for example if you’re installing a commercial plugin. The installation procedure is nearly the same as for installing a plugin you’ve already got locally, but from the Tools menu select Download Plugin… and fill in the Install Plugin window that appears. Among other things, you’ll need the full URL to the plugin; if the server hosting the plugin download requires a login you can specify a username and password in this window as well. As is the case with installing a local plugin, if the plugin archive is password-protected you should enter the password in this window.
Running A Plugin
Once a plugin has been successfully installed, you can run it simply by selecting it from the list of plugins. Under the Tools menu, select the Plugins submenu, then click the name of the plugin you wish to execute.
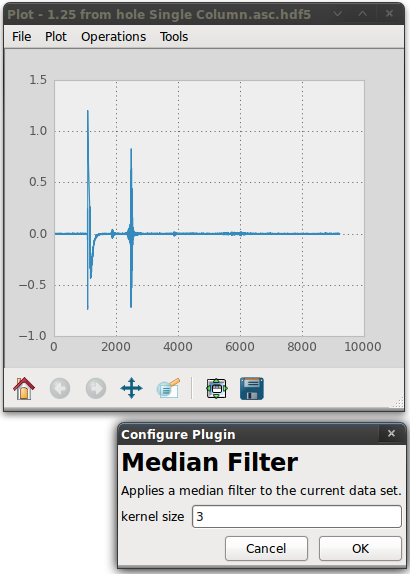
If a plugin requires extra information from you before executing, it will open a new window asking for the input. For example, NDIToolbox includes a median filter plugin that when run asks you to specify the rank (also known as the window length or kernel size) of the filter as shown below. In this example, the user is instructing the median filter plugin to run a filter of rank 3 on the data.
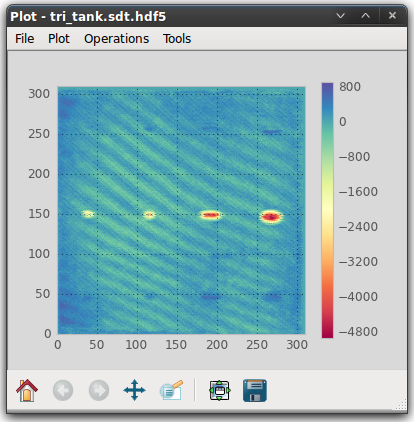
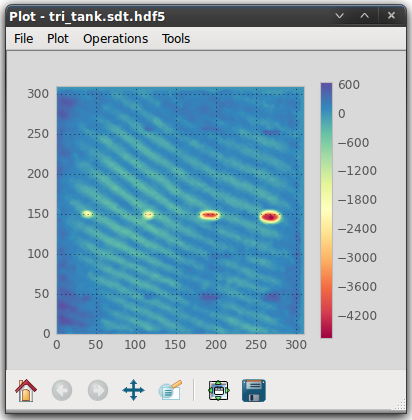
When a plugin is run, NDIToolbox passes it a copy of the current data set displayed in the plot window. The plugin performs its function on this data and returns it to NDIToolbox, which then updates the plot window with the results. Going back to the median filter plugin, here’s an example of the results of applying this plugin against an ultrasonic C-scan. The first image shown below is the original C-scan image plot; beneath that is the resulting C-scan after a median filter of rank 5 has been applied.
Since NDIToolbox keeps a copy of the original data, you can always reverse any changes a plugin makes to your data by selecting Revert To Original from the plot window’s Operations menu. The original data will be reloaded and the changes made by the plugin will be discarded.
Tips For Running Plugins
- Work with the smallest data set you can. Since a plugin’s time to complete is tied to the size of the data you run it against (the bigger the data the longer the plugin takes to run), you can speed things along by running plugins against data subsets where possible.
- Plugins and data dimensions. Not all plugins are capable of handling data with 3 or more dimensions. If you get strange results or errors when running a plugin against 3D data, it may be that the plugin wasn’t written to deal with this type of data.
- Plugins and the “MegaPlot.” Unless written specifically for this purpose, most plugins will not perform as expected when run against data in the MegaPlot. To work with this data presentation, the plugin would need to know not only how to deal with 3D data, but also how to retrieve data from the A, C, and B scans.
Plugins For The Developer
Note – this section assumes some familiarity with Python and software development
This section is for the prospective NDIToolbox plugin developer. Whether you’re looking to write a plugin to satisfy your own needs or interested in sharing with others, this section will give you a quick rundown on how to structure and deploy your plugin.
Plugins in NDIToolbox are typically written in Python, specifically Python 2.7. Provided you stick with the required structure of an NDIToolbox plugin (detailed below), you can write the majority of your application in any programming language you like as long as the plugin wrapper conforms to the NDIToolbox plugin standard. You may require additional steps to ensure that any ancillary distributables (runtime engines, DLLs, etc.) are installed and available.
If you stick to Python for your plugin, you have access to a variety of third-party libraries that are guaranteed to be installed if NDIToolbox is installed. At the time of writing, these libraries include:
- SciPy and NumPy
- matplotlib
- HDF5 for Python (read/write HDF5 data files)
- pydicom (read/write DICOM / DICONDE data files)
- Most installations will also have the Python Imaging Library (PIL) available as well, but this is not guaranteed.
When a user plots a data file, NDIToolbox scans the user’s plugins folder looking for valid plugins and automatically adds them to the Plugins submenu (under Tools) in the plot window. When a user selects your plugin to run, NDIToolbox starts your code and configures it if necessary, then passes your program a copy of the data to analyze. Your plugin does its work and makes a copy of the data to pass back to NDIToolbox, which updates the plot with the results.
The main entry point for a plugin (other than the plugin’s __init__ method) is its run() method. With a few restrictions (see below) you are generally free to structure your plugin as desired, but NDIToolbox will only call your plugin’s run() method. On execution, NDIToolbox spawns a new process and instantiates your plugin. This instance’s data attribute is set to the NumPy array currently in memory in the active plot window, and the run() method is called. After this method returns, NDIToolbox re-reads the instance’s data attribute and sets the active plot window’s data as this (possibly) new NumPy array. The plot is refreshed to show the new data to the user.
NDIToolbox plugins must be installed in the user’s plugins folder. Plugins can simply be copied over, or if you’re working with a plugin archive (see below), NDIToolbox can do it for you.
Structure Of A Plugin
All NDIToolbox plugins must be a subclass of AbstractPlugin (models/abstractplugin.py), and must define a few key fields. For convenience you can subclass CompanyPlugin (itself a subclass of AbstractPlugin) instead to get generic entries for these fields if you don’t want to set them yourself. If nothing else you should at least set the name field to something unique as this is the label your plugin is given in the Plugin menu.
- data property (get and set): NumPy array. NDIToolbox sets the data property on your plugin on creation, and reads it back to plot the results.
- description
- authors
- copyright
- name
- version
- url
- run() method
Here’s an example of a plugin that ships with NDIToolbox to normalize data.
__author__ = 'Chris R. Coughlin'

from models.abstractplugin import TRIPlugin
import numpy as np

class NormalizePlugin(TRIPlugin):
    """Normalizes the current dataset, demonstrates
    how to write plugins for the A7117 project"""

    # At a minimum plugin developers should specify a plugin name and a
    # short description as these are displayed to the user.  The fields
    # required for a plugin are detailed below.
    #
    # Sub-classing a company plugin such as TRIPlugin or
    # ComputationalToolsPlugin will pre-populate these fields with
    # default values.
    name = "Normalize Data" # Name in the Plugin menu
    description = "Normalizes current data set"
    authors = "Chris R. Coughlin (TRI/Austin, Inc.)"
    version = "1.0"
    url = "www.tri-austin.com"
    copyright = "Copyright (C) 2012 TRI/Austin, Inc.  All rights reserved."

    def __init__(self):
        super(NormalizePlugin, self).__init__(self.name, self.description,
            self.authors, self.url, self.copyright)

    def run(self):
        """Executes the plugin - if data are not None they are normalized
        against the largest single element in the array."""
        if self._data is not None:
            max_el = np.max(self._data)
            self._data = self._data / max_el
In addition, if you define a dict named config in your plugin, NDIToolbox will show the user a configuration dialog with each option and allow the user to make changes to the defaults you set in your code. For example, here’s the code for the Median Filter plugin that ships with NDIToolbox. By default, the Median Filter will apply a median filter of rank 3 to the current data set, but the user is free to specify any other size.
"""medfilter_plugin.py - applies a median filter to the current data set,
used to demonstrate incorporating configuration options in an A7117 plugin

Chris R. Coughlin (TRI/Austin, Inc.)
"""

__author__ = 'Chris R. Coughlin'

from models.abstractplugin import TRIPlugin
import scipy.signal

class MedianFilterPlugin(TRIPlugin):
    """Applies a median filter to the
    current data set"""

    name = "Median Filter"
    description = "Applies a median filter to the current data set."

    def __init__(self):
        super(MedianFilterPlugin, self).__init__(self.name, self.description,
            self.authors, self.url, self.copyright)
        # If a config dict is defined in a Plugin, the UI will present the user
        # with a dialog box allowing run-time configuration (populated with the
        # default values set here).  Although vals can be of any pickle-able type,
        # they are returned as str.
        self.config = {'kernel size': '3'}

    def run(self):
        """Runs the plugin, asking the user to specify a kernel size for the median filter.
        A filter of rank A where A is the specified kernel size is then applied to the
        current data set in each dimension.  An even kernel size is automatically
        incremented by one to use an odd number-SciPy's medfilt function requires odd
        numbers for kernel size.
        """
        if self._data is not None:
            # The UI returns configuration options as str - the Plugin is
            # responsible for casting them to required type
            kernel_size = int(self.config.get('kernel size', 3))
            if kernel_size % 2 == 0:
                # medfilt function requires odd number for kernel size
                kernel_size += 1
            self._data = scipy.signal.medfilt(self._data,
                kernel_size)
When this plugin is run, NDIToolbox displays a window that allows the end user to change the filter size. The name and description attributes you specify are also displayed in this window.
There are few restrictions on what your plugin does or how you organize your code. The only hard restriction is that the run() method can’t spawn subprocesses (threads are ok however) because NDIToolbox runs the plugin in a separate process. You might also find it tough to build a full GUI for a plugin because of this restriction. Generally you should think of a plugin as a fairly small application; if you need more functionality a better home might be under the main UI’s Tools menu (as we’ve done with the POD Toolkit for example).
Distributing Plugins
If you’d like to share your plugin with others you can simply send them the files, or if you have access to a server you can host a plugin archive and have NDIToolbox download and install it for them automatically. To host a plugin you’ll need to make a ZIP archive of all its files, and the ZIP has to follow a few rules.
- The ZIP has to have the same basename as your plugin’s main Python source file, e.g. if your plugin is named super_filter_plugin.py, the ZIP must be named super_filter_plugin.zip.
- The plugin’s main Python source file must be in the root folder of the ZIP.
- The ZIP must also contain an ASCII readme (or README, readme.txt, README.TXT) file in the root folder of the ZIP. If the user asks for more information about the plugin before installing, this is the file that’s displayed to them. You should summarize what it does, who wrote it, changelog, etc.
- All other files you need to ship with your plugin must be in a subfolder, and the subfolder must have the same basename as the ZIP and the plugin’s main source file. So for example if your plugin’s Python file is MyFantasticPlugin.py all ancillary files must be in the MyFantasticPlugin folder in the MyFantasticPlugin.zip archive.
- If you want to password-protect your plugin’s ZIP file, you must use a global password rather than set passwords for individual files inside the ZIP.
- If you want to require a username and password to access the plugin archive on your server, NDIToolbox only supports basic access authentication via HTTP/HTTPS. Note that this feature has not been extensively tested and should be considered experimental.
There’s an example of the proper plugin archive structure under models/tests/support_files/good_medfilter_plugin.zip. Remember that if your plugin uses Python libraries that aren’t part of the default NDIToolbox installation, you are responsible for ensuring these dependencies are installed and available. Consider building a full-fledged installer or using standard Python tools such as easy_install or pip if your application has extensive dependencies, rather than relying on the user. This helps avoid problems with versions – your application ships with a known good structure, which can reduce your support and development costs.
Plugins In Other Languages
Once you’ve written a basic plugin subclassing AbstractPlugin and provided a run() method, you’re free to use any other programming languages to write your toolkit. When using Python as a “wrapper” over other languages, it’s worth considering how your external code will interact with Python and NDIToolbox.
The Python community has developed many projects to assist interaction between Python and another programming language, some of the more popular languages and their associated projects include:
If you are unable to find a project that connects your language of choice to Python, consider alternative communication mechanisms like JSON or XML-RPC. Python has built-in library support for both communication protocols (docs.python.org/library/json.html and docs.python.org/library/xmlrpclib.html respectively). Although this will require more Python development in your application, the bulk of your code can still be in the language of your choice.
Building on the concept of JSON and similar communications mechanisms, you can also develop your plugin as a Software As A Service application, in which the bulk of your code is hosted on a server and the local plugin communicates with this server to provide functionality. Not only does this approach streamline the installation process if your plugin relies on external dependencies, it also provides an additional layer of security if you are concerned about protecting intellectual property (IP).
Intellectual Property Considerations
In general we recommend staying as open as possible with your toolkit. NDIToolbox is primarily an open source application in keeping with our goal to encourage collaboration in the field of NDI data analysis. No code protection or obfuscation system is 100% effective. However, we also recognize that some code must have some level of protection, such as third-party commercial libraries with restrictive licensing.
If you do need to protect intellectual property in your application, your first line of defense is to ship only byte-compiled Python code (i.e. the .pyc files rather than the .py source code files). This offers some level of protection against casual observation, however the code can be disassembled to recover the original source code. The situation is much the same as the one developers face in shipping Java or .NET code, save that both Java and .NET have a number of code protection products available and as of this writing we have been unable to locate analogous
Python products.
If possible, consider also factoring out your IP into C, C++, D, or Objective C; compiling; and then calling from your Python code with the Python C API or another suitable bridge. These languages create final products that are one level up in terms of the difficulty in disassembling since they create machine code rather than bytecode. Disassembled machine code normally creates assembly language, which is more difficult to parse for the average person. The C and C++ languages also have a number of code protection and obfuscation tools available to the commercial developer.
For an extra level of protection, consider implementing your IP as a Software as a Service (SaaS) application in which your IP is on a server under your control and the toolkit is essentially a client. As mentioned earlier Python has built-in support for remote procedure protocols such as JSON or XML-RPC, or you could implement a standard HTTP/HTTPS interface in much the same manner.